150m HDMI POE Extender over IP
150m HDMI POE Extender over IP
150m HDMI POE Extender over IP
- Detail
- Parameters
150m HDIM POE extender over IP
1.Description
The H.264 HDMI extender adopts standard Ethernet TCP/IP protocol, transmit HD video and audio over single cat6 cable, and support One-to-many applications with POE switches. The equipment has excellent image p
rocessing and transmission capacity, makes signal transmission more smooth and steady, is a kind of economic and efficient way of HDMI signal extension.
2.Features
Transmits HDMI video and audio signals up to 150m over a single CAT6 cable;
Support video resolution up to 1920*1080P@60Hz;
Supports over TCP/IP protocol, One-to-many,many-to-many applications with POE switches;
Supports Stereo Audio over IP, independent to HDMI extension Support over TCP/IP;
Supports USB (Keyboard, Mouse) extension over IP;
Compliance with HDMI 1.3 and HDCP 1.2 standard;
High compatibility, can auto-match source and display device;
Built-in automatic adjustment system, make the image smooth, clear and stable;
Simple to install, plug and pla
3.Package list
HDMI transmitter 1pcs
HDMI receiver 1pcs
.USB-A to USB-MINI data cable 1pcs
.Power adapter 2pcs
.User manual 1pcs
.IR Transmitter/Receive cable
4. Specifications
Parameter | Description | |
Video | Standards | HDMI 1.3; HDCP 1.2 |
Compressed format | H.264 | |
Maximum pixel clock | 165MHz | |
Maximum data rate | 6.75Gbps | |
Resolution | 1920X1080P@60Hz | |
Connector | HDMI-A | |
Impedance | 100Ω | |
IR | Interface | 3.5mm earphone seat |
Signal direction | Unidirectional | |
Signal type | Digital | |
IR frequency | 20-60kHz | |
UTP | Interface | RJ45 |
Transmission distance | CAT6---150m CAT5E---150m | |
Other | Power supply | The power adapter: DC 12V POE input voltage range:36~57V |
Power dissipation | MAX 3.3W | |
Temperature | Operating: -5℃ ~ +70℃ | |
Humidity | Operating: 5% ~ 90% | |
Dimension | 119*81.7*23mm | |
The warranty | 1 year free warranty | |
5.Panels
Transmitter:

Item | Description |
1 | PWR light: Lit when the machine is powered on |
2 | Link light: Flashes during data transfer |
3 | TAN key: Digital tube group ID ten-digit adjustment button |
4 | ONE key: Digital tube group ID bit adjustment button |
5 | Two-digit digital tube: display 01-99 set ID |
6 | OK key: After selecting the group ID with TAN and ONE buttons, press OK key to confirm, otherwise the last group ID will be restored after ten seconds |
7 | MODE button: Click to start DHCP mode |
8 | RST keys: Press and hold to restore factory settings |
9 | Remote infrared reception: The group ID can be adjusted via the remote control |
10 | USB port: Computer USB input |
11 | HD output port: HDMI display for connecting displays |
12 | HD input port: Connect to your device (computer host, notebook, or box) |
13 | IR OUT port: Connect the IR transmitter |
14 | RS232 port: RS232 remote control, supported by the Baud rate of 115200 |
15 | RJ45 port: Connect a switch or router over a local area network |
16 | DC 12V port: 12/1A power input is required |
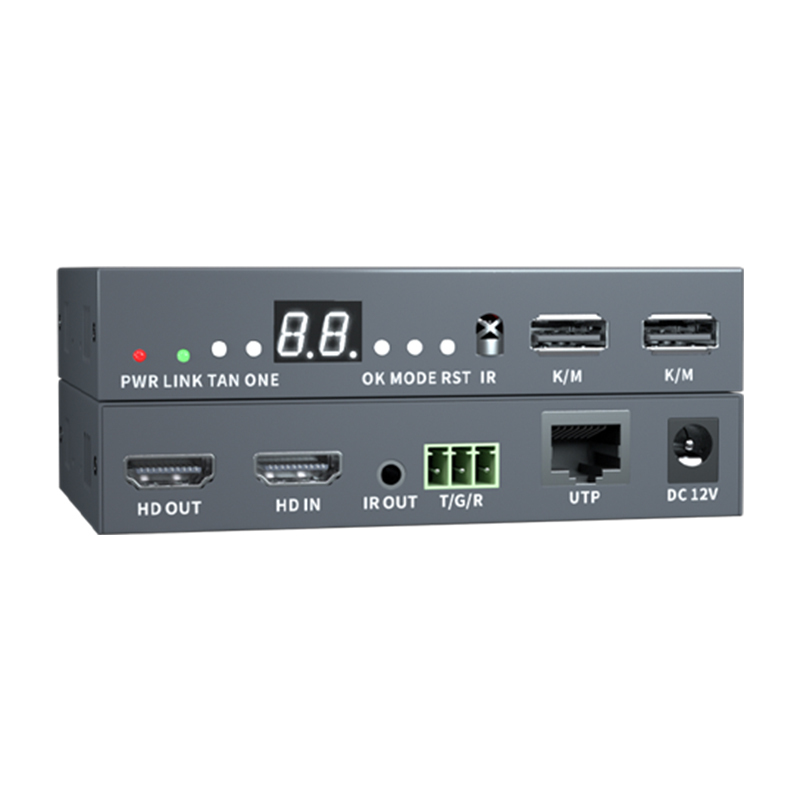
Receiver:
Item | Description |
1 | PWR light: Lit when the machine is powered on |
2 | Link light: Flashes during data transfer |
3 | TAN key: Digital tube group ID ten-digit adjustment button |
4 | ONE key: Digital tube group ID bit adjustment button |
5 | Two-digit digital tube: display 01-99 set ID |
6 | OK key: After selecting the group ID with TAN and ONE buttons, press OK key to confirm, otherwise the last group ID will be restored after ten seconds |
7 | Mode button: Click to switch Graph/Video display mode and the output will have a corresponding display alert |
8 | RST keys: Press and hold to restore factory settings |
9 | Remote infrared reception: The group ID can be adjusted via the remote control |
10 | K/M port: Key mouse input |
11 | K/M port: Key mouse input |
12 | HD output port: HDMI display for connecting displays |
13 | IR port: IR (20KHz-60KHz) input |
14 | RS232 port: RS232 remote control, supported by the Baud rate of 115200 |
15 | RJ45 port: Connect a switch or router over a local area network |
16 | DC 12V port: 12/1A power input is required |
6.Installation
1、 Will the HDMI source access HDMI extender transmitter;
2、Connect the HDMI extender the receiver to display devices (such as high-definition TV, splicing screen, etc.);
3、Connect the launching end IR OUT to the infrared transmitting line, and the transmitting line should be aligned with the remote control equipment required.
The receiver IR IN is connected to the infrared receiving line, and the receiving head is placed within the range of the remote control;
4、Connect the TX USB port to your computer or notebook via a configuration cable, and the K/M port of the RX to the mouse and keyboard.
5、the control side of the RS232 signal connected to the TX and RX RS232 port, the Baud rate adjusted to 115200;
6、Use a CAT5e/6 network cable to connect the network interface between the sender and receiver or cascade through a switch;
7、The transmitter and the receiver connected to the power Or connect the POE to power, when the lamp lights up normally, normal operation of system.
*DT241M group adjustment:
-TX group adjustment: through TAN, ONE adjust the ID, press OK key to confirm that the TX group up to 01-99, pay attention to can not set repeated ID number.
-RX group adjustment: after adjusting the ID through TAN and ONE, press OK key to confirm that the group of RX is up to 01 to 99, the set ID number will display the corresponding TX image;A single set of RX sets up to 255 identical IDs.
*RS232 definition: The three pins of the interface from left to right are: TX, Ground, and RX.
7.Diagram
(1). .extender (1 to 1)
(2). the allocation extender (1 to N): all RX ID number adjusted to TX ID, can achieve 1 TX to 255 RX
(3). switcher (N to 1): by adjusting RX's ID number, switch to the corresponding TX
(4). matrix (M to N): by adjusting RX's ID number, switch to different ID TX, to achieve many-to-many mode
8.Warranty
Please keep the user manual in a place where safety and easy to find so that you can read it immediately when meet problems.
safety instruction:
Please do not disassemble this product by yourself because it doesn't including DIY function.
Please don't make the product touch water in case damaged, because it is Not waterproof design.
Please use dry cloth material when clean the product surface.
Please do not use this product in the environment of too wet or too high temperature.
Please avoid contact with corrosive substances.
When there is damage or other physical damage to the product, please stop using and contact with customer service to get support.